Essential Airbrush Accessories & Tools: The Complete Checklist (2026)
You’ve got your airbrush and compressor. You’re ready to paint, right?
Almost. There’s a collection of accessories, tools, and supplies that sit between “I own an airbrush” and “I can actually use it comfortably.” Some are absolutely essential — you literally can’t airbrush safely without them. Others make your life dramatically easier. And a few are nice-to-have luxuries that you’ll appreciate down the road.
After 13+ years of airbrushing, I’ve bought (and wasted money on) more accessories than I can count. This guide sorts everything into clear priority tiers so you know what to buy first, what to buy soon, and what to buy when you’re ready to upgrade your setup.
Quick Reference: The Complete Checklist
| Priority | Item | Est. Cost | Why You Need It |
|---|---|---|---|
| MUST HAVE | Air hose | $8–20 | Connects airbrush to compressor |
| MUST HAVE | Moisture trap | $8–15 | Prevents water in your paint |
| MUST HAVE | Respirator mask | $20–35 | Protects your lungs — non-negotiable |
| MUST HAVE | Cleaning solution | $8–15 | You can’t clean without it |
| MUST HAVE | Cleaning pot / spray-out pot | $10–20 | Catches overspray during cleaning |
| MUST HAVE | Paper towels / lint-free cloths | $5 | For cleaning, wiping, testing |
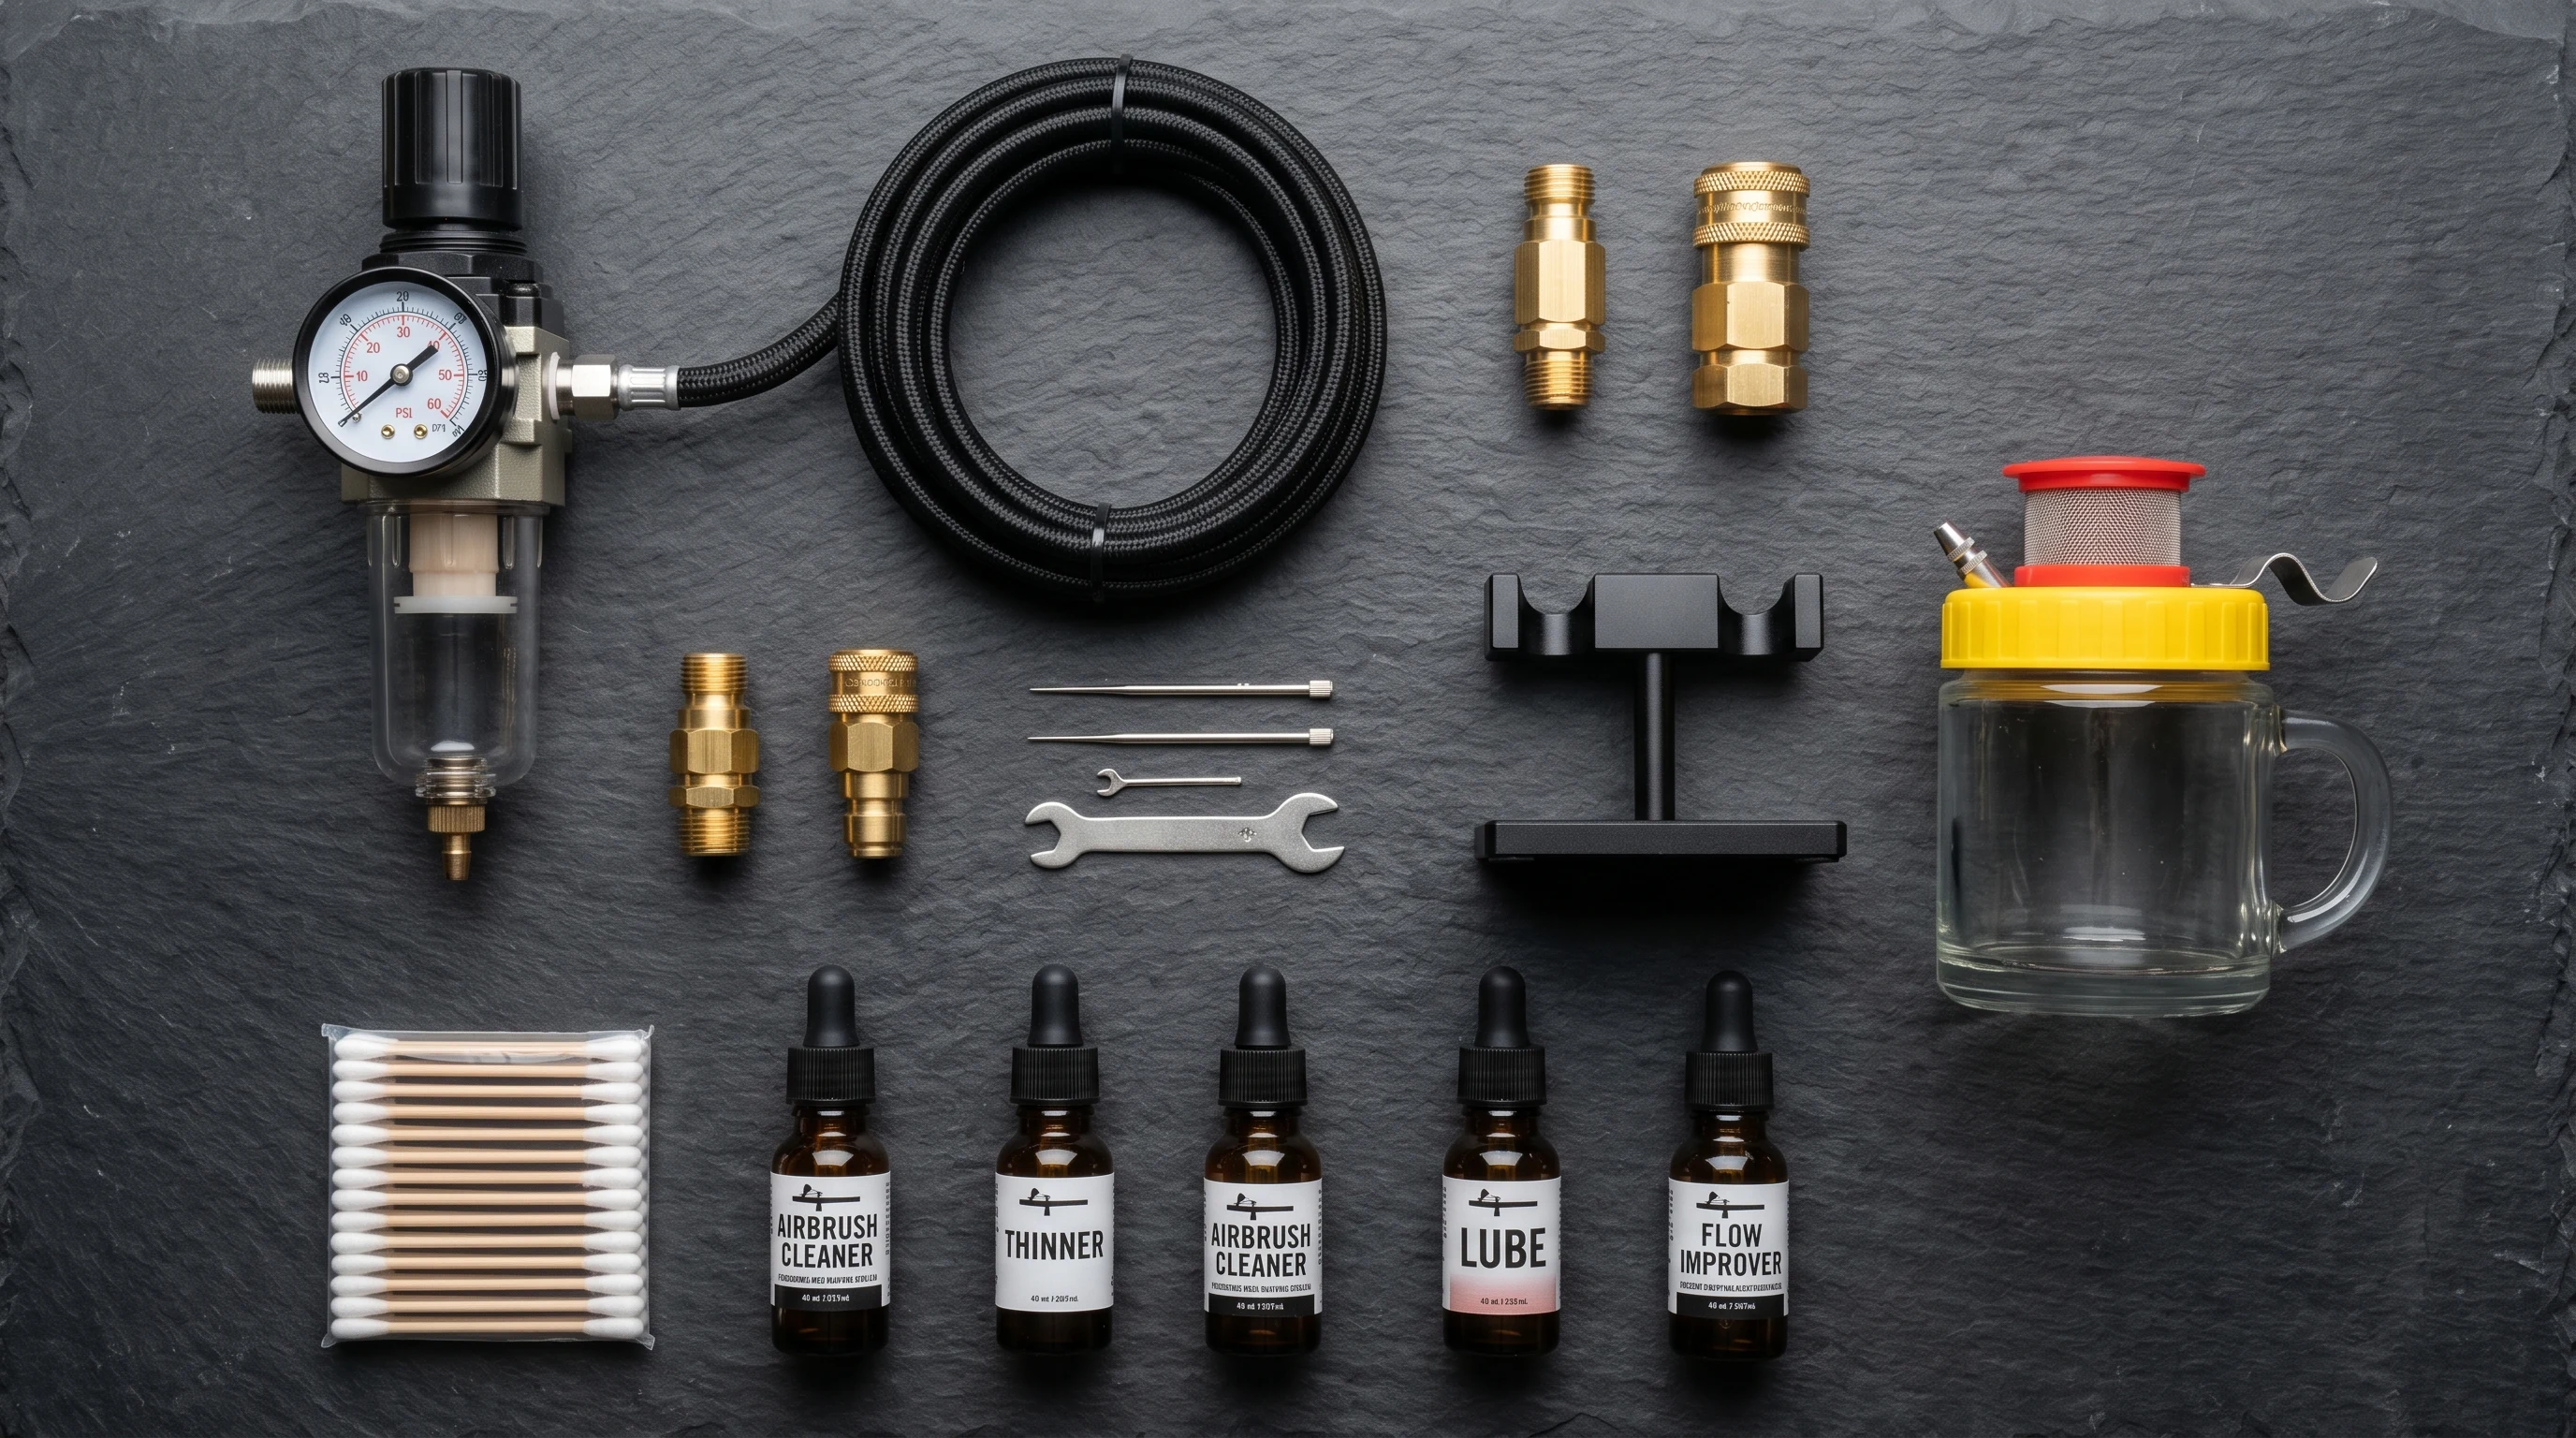
| SHOULD HAVE | Quick-disconnect coupling | $8–15 | Swap airbrushes in seconds |
| SHOULD HAVE | Airbrush holder/stand | $8–25 | Prevents tipping, frees your hands |
| SHOULD HAVE | Cleaning brush set | $5–12 | For deep cleaning internal passages |
| SHOULD HAVE | Needle lubricant | $5–8 | Smooth trigger, prevents paint creep |
| SHOULD HAVE | Masking tape (various) | $5–15 | Straight lines, protect areas |
| SHOULD HAVE | Mixing cups / droppers | $5–10 | Thin paint before loading |
| NICE TO HAVE | Spray booth | $40–150 | Captures overspray, protects workspace |
| NICE TO HAVE | Airbrush regulator (inline) | $15–30 | Precise pressure at the brush |
| NICE TO HAVE | Spare needles & nozzles | $10–25 | Backup for accidents |
| NICE TO HAVE | Frisket film / liquid mask | $8–15 | Precision masking for artwork |
| NICE TO HAVE | Ultrasonic cleaner | $25–40 | Deep cleaning powerhouse |
| NICE TO HAVE | Cutting mat + X-ACTO knife | $10–20 | For stencil and mask cutting |
| NICE TO HAVE | Easel or work surface | $20–80 | Proper working position |
MUST-HAVE: Buy These Before Your First Session
These are the items you need on day one. Without them, you either can’t use your airbrush at all or you’re putting your health at risk.
Air Hose
The hose connects your airbrush to your compressor. If your compressor came with a hose, you’re probably fine for now. If you’re buying separately, look for a braided nylon hose (more flexible and durable than rubber) in 6-foot length.
The fitting trap: Airbrush hoses have different thread sizes on each end — typically 1/8” BSP on the airbrush side and 1/4” BSP on the compressor side. Before buying, check what threads your airbrush and compressor use. If they don’t match (very common), you’ll need adapter fittings. A small set of BSP adapters ($5–8) saves a lot of frustration.
Moisture Trap
Compressors generate moisture as they compress air. That moisture travels through the hose and into your airbrush, where it mixes with paint and causes splattering, fisheyes, and ruined work.
A moisture trap catches this water before it reaches your airbrush. Many compressors have a built-in moisture trap, but adding a second inline moisture trap close to the airbrush provides extra insurance, especially in humid environments.
Tip: The closer the moisture trap is to the airbrush, the more effective it is. Mount one at the compressor AND one at the end of the hose near the airbrush for the best protection.
Respirator Mask
This is not optional. Even water-based acrylic paints create fine aerosolized particles when sprayed through an airbrush. These particles are small enough to penetrate deep into your lungs and accumulate over time. Solvent-based paints (lacquers, enamels, urethanes) produce genuinely toxic fumes that can cause acute and chronic health damage.
What to get: A proper half-face respirator with P100 particulate filters for water-based paints, or organic vapor cartridges (OV/P100 combo) for solvent-based paints. The 3M 6000/7500 series respirators are the industry standard — comfortable, effective, and widely available.
What NOT to get: Disposable dust masks (the thin white ones) are insufficient. They don’t filter fine paint particles and provide essentially no protection against solvent fumes.
Replace filters regularly — particulate filters when breathing becomes difficult (typically every 40 hours of use), and organic vapor cartridges when you can smell solvents through the mask.
Cleaning Solution
You need a cleaning solution that matches your paint type. For water-based acrylics (the most common), Createx Airbrush Cleaner, Iwata Medea Cleaner, or Vallejo Airbrush Cleaner all work well. Buy a large bottle — you’ll go through it faster than you expect.
See our complete cleaning guide for detailed recommendations by paint type.
Cleaning Pot / Spray-Out Pot
A cleaning pot is a closed container with a hole for your airbrush nozzle. You spray cleaning solution and waste paint into it instead of into the air. This keeps your workspace clean and reduces airborne particles. Most also have an airbrush holder built in.
The 3-in-1 cleaning pots (clean, hold, and filter) are the most popular option and cost around $10–20. They’re not glamorous, but you’ll use one every single session.
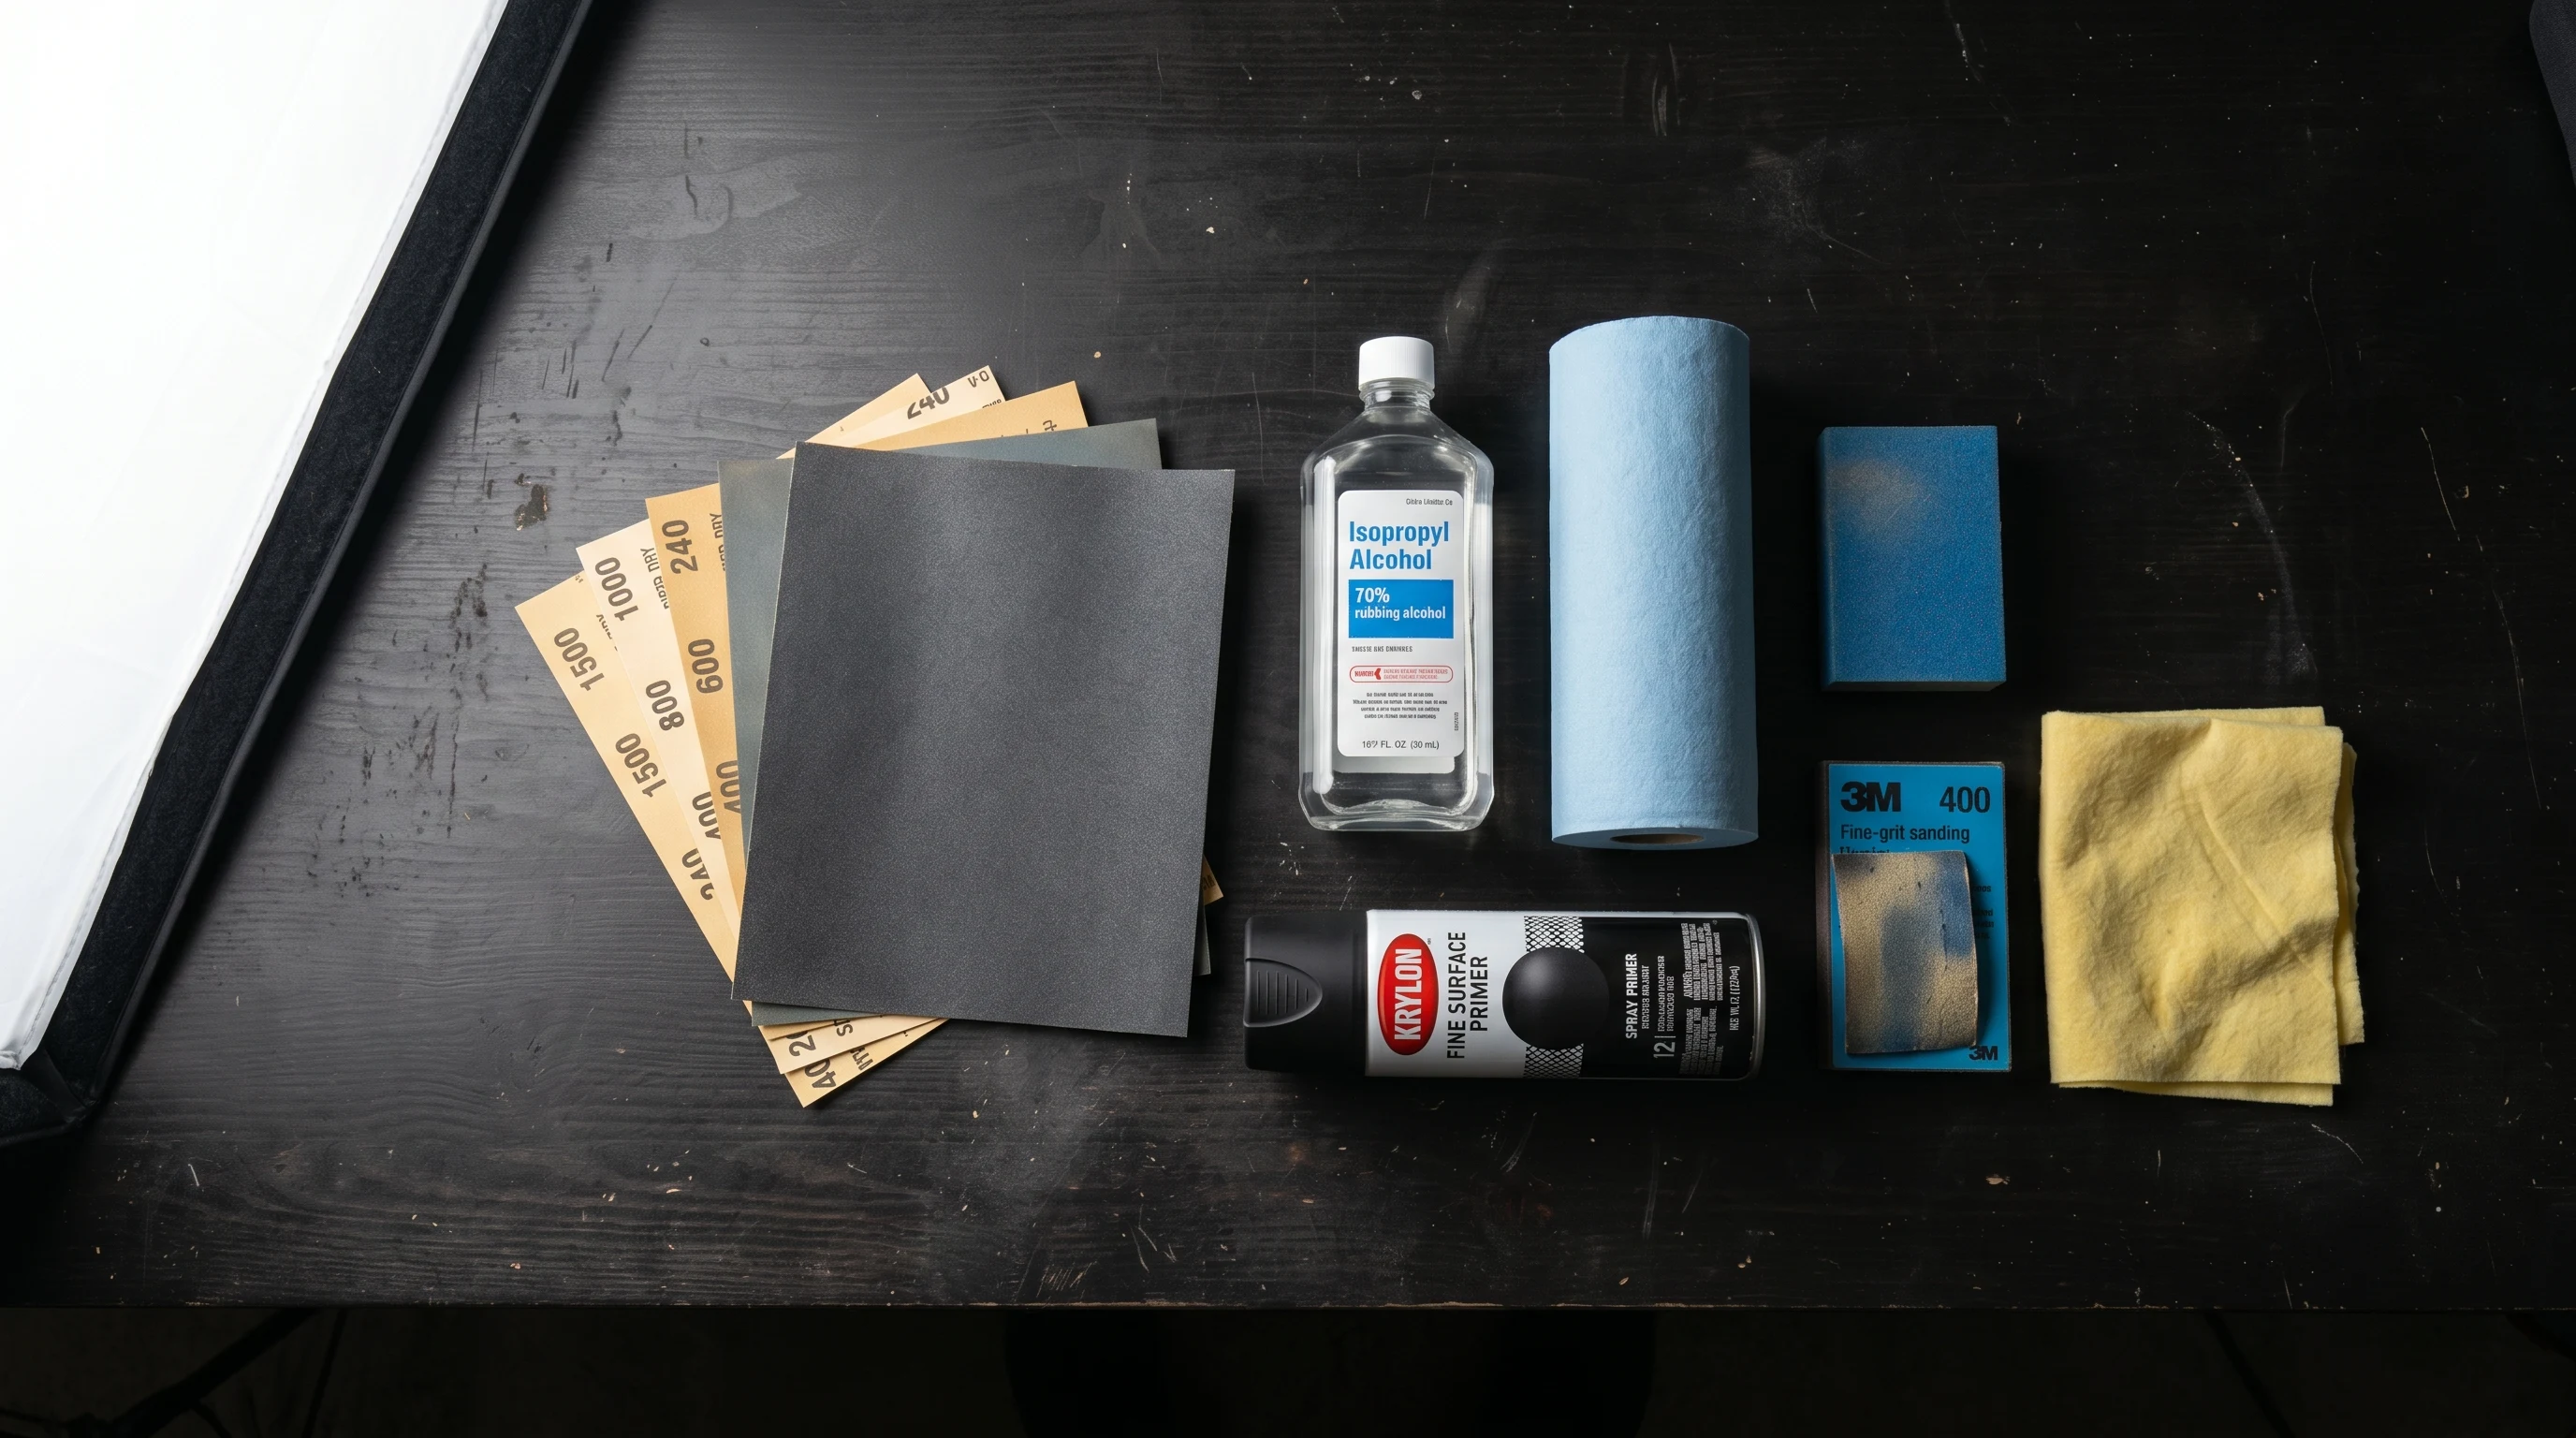
Paper Towels or Lint-Free Cloths
You’ll use these constantly: wiping the cup between colors, cleaning the needle, testing spray on a surface before painting your actual piece, and general cleanup. Keep a roll within arm’s reach of your airbrush station at all times.
For needle cleaning specifically: Lint-free cloths or microfiber squares work better than paper towels, which can leave fibers on the needle tip.
SHOULD HAVE: Buy These Within Your First Month
You can technically airbrush without these, but they make the experience significantly better.
Quick-Disconnect Coupling (QD)
A quick-disconnect coupling lets you snap the airbrush on and off the hose without threading anything. Push on, pull off — takes one second. This is invaluable if you own multiple airbrushes, need to switch between a detail brush and a priming brush, or want to remove the airbrush for deep cleaning without unscrewing fittings every time.
Get a set: One female connector on the hose (stays permanently attached) and one male adapter for each airbrush you own. Badger and Iwata both make reliable QD sets, or buy generic brass ones for less.
Airbrush Holder / Stand
An airbrush is a precision instrument with a delicate needle tip. Laying it down on a desk is risky — it can roll, and anything touching the needle tip will bend it. An airbrush holder keeps your brush upright and secure when not in use.
Options range from simple clamp-on desk holders ($8–12) to multi-airbrush stations that hold 4–6 brushes ($15–25). If your cleaning pot has a built-in holder, that might be enough to start.
Airbrush Cleaning Brush Set
While cotton swabs and paper towels handle basic cleaning, a proper cleaning brush set (long, thin brushes in various sizes) reaches inside the airbrush body, through the paint passage, and into areas cotton swabs can’t access. Essential for deep cleaning.
Budget alternative: Interdental brushes from the pharmacy work surprisingly well for airbrush cleaning and cost less per brush than dedicated airbrush cleaning sets.
Needle Lubricant
A tiny amount of needle lubricant applied to the needle before reinserting creates a smooth, consistent trigger feel and prevents paint from creeping backward along the needle through the packing seal. This is especially important for airbrushes with rubber seals (most budget models).
Badger Regdab is the most popular option. Iwata Super Lube works too. A single bottle lasts years because you use microscopic amounts each time.
Masking Tape
Masking tape creates clean, straight lines and protects areas you don’t want to paint. For airbrush work, you need low-tack tape that won’t pull up underlying paint or leave adhesive residue.
Good options:
- Tamiya masking tape — the gold standard for model work. Available in multiple widths (6mm, 10mm, 18mm). Excellent adhesion without damage.
- 3M Fine Line tape — automotive-grade, very thin, creates extremely sharp lines. More expensive but worth it for precision work.
- Blue painter’s tape — good for general masking of larger areas. Not precise enough for fine airbrush work but useful for protecting surfaces.
You’ll use more masking tape than you think. Buy at least two widths: a narrow one (6–10mm) for detail masking and a wide one (18–24mm) for general protection.
Mixing Cups / Pipettes / Droppers
Most paints need thinning before airbrushing. Rather than guessing ratios directly in the airbrush cup (and risking a clogged airbrush from under-thinned paint), mix your paint in a small cup first, then pour the thinned mixture into the airbrush.
Disposable plastic mixing cups ($5 for a stack of 100) work perfectly. Plastic pipettes or eye droppers ($3–5 for a pack) make measuring drops of thinner precise and repeatable.
NICE TO HAVE: Upgrade Your Setup
These items aren’t essential for getting started, but they significantly improve your workspace, safety, and results as your skills develop.
Spray Booth
A spray booth is an enclosed workspace with a fan that extracts paint overspray and fumes. For hobbyists working indoors, it’s a major quality-of-life upgrade — it captures stray paint mist, reduces the amount of particles in your breathing air (still wear a respirator!), and keeps your desk and surroundings clean.
Portable hobby spray booths ($40–80) are fan-powered enclosures with filters. They’re adequate for water-based acrylic work on small to medium projects. For solvent-based paints or larger work, you need either a more powerful commercial booth or to work outdoors/in a well-ventilated garage.
DIY option: Building your own spray booth from a plastic storage bin and a bathroom exhaust fan is a popular project. It works, but be aware that paint fumes from solvent-based paints can be explosive — any DIY booth must vent outside, not just filter and recirculate.
Inline Pressure Regulator
While your compressor likely has a pressure gauge and regulator, an inline regulator mounted close to the airbrush gives you more precise control. This is especially useful for work that requires very low pressure (10–15 PSI), where the compressor’s main regulator may not be sensitive enough.
An inline regulator with a mini gauge ($15–30) also lets you adjust pressure without walking over to the compressor every time — a small convenience that becomes significant during long sessions.
Spare Needles and Nozzles
Needles bend. It happens to everyone, especially beginners. A bent needle tip produces an off-center, distorted spray pattern that no amount of cleaning will fix. Having a spare needle ($8–15) means you’re back to painting in 30 seconds instead of waiting for a replacement to arrive.
Nozzles are less fragile but still wear over time — the precision bore gradually enlarges from needle friction, and eventually the spray pattern loses its sharpness. Keep one spare nozzle ($10–20) on hand.
IMPORTANT: Needles and nozzles are specific to your airbrush model AND needle size. A 0.35mm needle for an Iwata Eclipse won’t fit a Harder & Steenbeck Evolution. Always verify exact part numbers before ordering.
Frisket Film and Liquid Mask
For illustration, fine art, and custom painting, frisket film is a self-adhesive masking material that you apply to your surface and cut with an X-ACTO knife to reveal areas to be painted. It comes in rolls or sheets, in matte or glossy finish, and in different tack levels (low-tack for delicate surfaces, standard for illustration board).
Liquid frisket (liquid mask) is brushed on to mask complex shapes that would be difficult to cut from film — intricate details, organic shapes, or areas too small for tape. Once dry, it forms a rubbery film that peels off cleanly after painting.
Both are specialty tools for artistic airbrush work rather than everyday accessories, but essential if your projects involve illustration, portraits, or custom designs.
Ultrasonic Cleaner
A small jewelry-size ultrasonic cleaner ($25–40) transforms deep cleaning from a 30-minute chore into a 5-minute set-and-forget process. Drop your disassembled airbrush parts (nozzle, air cap, needle cap) into the cleaning bath, press start, and the ultrasonic vibration does the work. Particularly effective for nozzles with stubborn paint buildup in the precision bore.
See our cleaning guide for detailed ultrasonic cleaner usage.
Cutting Mat + X-ACTO Knife
If you use frisket film, stencils, or any masking material that needs cutting, a self-healing cutting mat and a sharp X-ACTO knife are essential partners. The cutting mat protects your work surface and the precise blade lets you cut intricate mask shapes without tearing.
Keep spare blades on hand. A dull blade drags and tears masking material instead of cutting cleanly. Change blades frequently — they’re cheap.
Easel or Dedicated Work Surface
Your working position matters more than you’d think. Hunching over a desk for hours causes fatigue and reduces the steadiness of your hand. The right easel or work surface depends on what you’re painting:
- Illustration, portraits, flat surfaces: A tilting tabletop easel or drafting-style desk lets you work at a comfortable angle. The surface should be sturdy enough not to vibrate when you rest your hand on it.
- Models, miniatures, 3D objects: A painting handle or rotating turntable ($10–20) lets you rotate the object while keeping your hand steady. More useful than a traditional easel for three-dimensional work.
- Automotive, helmets, large objects: You’ll work standing, usually with the piece on a workbench or suspended. An adjustable-height surface saves your back.
Projector or Lightbox
For illustration and fine art airbrush work, transferring a design from reference to your painting surface is a critical first step. A projector lets you beam the design directly onto your surface for tracing, while a lightbox lets you see through paper or thin canvas to trace from a reference placed underneath.
These used to be expensive, but LED lightboxes are now available for $15–30, and basic mini projectors for $30–80. Neither is essential for beginners, but both become very useful as your projects become more ambitious.
Hose Fittings and Compatibility: The Beginner’s Nightmare
This topic deserves special attention because it trips up almost every beginner.
Airbrush hoses, compressors, and airbrushes use different thread standards depending on the brand and region. The most common are:
- 1/8” BSP — Standard on most airbrushes and many compressors
- 1/4” BSP — Common on larger compressors and industrial equipment
- M5 (metric) — Used on some European airbrushes (notably some Harder & Steenbeck models)
If your airbrush has 1/8” BSP threads and your compressor has 1/4” BSP, you need an adapter. If your hose has the wrong size on either end, you need adapters there too.
The simplest solution: Buy a small adapter set ($5–10) that includes 1/8” to 1/4” BSP adapters in both male and female configurations. This covers 95% of compatibility issues.
Even simpler: When buying your hose, make sure it has 1/8” BSP on the airbrush end and whatever your compressor needs on the other end. Most airbrush supply stores list compatible hose configurations for popular compressor brands.
What NOT to Waste Money On (Yet)
Some accessories are heavily marketed to beginners but aren’t worth buying early:
Complete airbrush cleaning kits ($30–50) — These bundle a cleaning pot, brushes, solution, and sometimes spare parts. They’re convenient but overpriced. Buy the items individually and you’ll spend less while getting better quality of each component.
Airbrush-brand cleaning solutions when generic works — For water-based acrylics, isopropyl alcohol or even ammonia-based window cleaner cleans effectively at a fraction of the cost of branded airbrush cleaner. Branded cleaners are nice but not essential.
Multiple airbrushes before you’ve mastered one — The urge to buy a second (or third) airbrush is strong, but until you’re comfortable with cleaning, trigger control, and paint thinning on your first airbrush, a second one just doubles the cleaning and troubleshooting time.
Expensive stencil sets — Until you know what kind of work you want to do, generic stencils sit unused. Start with masking tape and frisket film, which are more versatile. Buy project-specific stencils when you have a specific project in mind.
Setting Up Your Workspace
With all your accessories gathered, here’s how to arrange an efficient airbrush workspace:
Within arm’s reach (dominant hand side):
- Airbrush on holder/stand
- Cleaning pot
- Paper towels
- Squeeze bottle of cleaning solution
- Current paint(s)
Within arm’s reach (other side):
- Mixing cups and pipettes
- Masking tape and cutting tools
- Reference material
Behind you or to the side:
- Compressor (on the floor is fine — keeps noise and heat away from your work area)
- Spray booth (if using one)
- Paint storage
On you:
- Respirator (always)
- Optional: latex/nitrile gloves, apron
The key principle: minimize the distance between your airbrush hand and the supplies you use most. Color changes should take 30 seconds, not 2 minutes of reaching and rearranging.
Total Startup Cost: What to Expect
Excluding the airbrush and compressor themselves, here’s what a complete accessory setup costs:
| Tier | What’s Included | Estimated Cost |
|---|---|---|
| Bare minimum | Hose, moisture trap, respirator, cleaning solution, cleaning pot, paper towels | $55–100 |
| Recommended starter | Above + QD coupling, holder, cleaning brushes, needle lube, masking tape, mixing cups | $100–170 |
| Full setup | Above + spray booth, spare needle/nozzle, frisket, ultrasonic cleaner, cutting mat, regulator | $200–350 |
These costs are one-time purchases that last for years (except consumables like cleaning solution, tape, and filters). The investment pays for itself quickly in better results, easier maintenance, and a more enjoyable workflow.
Frequently Asked Questions
What accessories come with an airbrush?
Most airbrushes come with the airbrush itself, a nozzle wrench (for threaded nozzle models), and sometimes a small bottle of lubricant. Some kits include a hose and basic cleaning tools, but most do not include a compressor, hose, moisture trap, cleaning solution, or safety equipment — those are purchased separately.
Do I need a spray booth for airbrushing?
Not strictly necessary, especially for small-scale work with water-based paints. But even light overspray accumulates over time, coating everything near your workspace in a fine paint mist. A spray booth ($40–80) captures this overspray and improves air quality. If you use solvent-based paints (lacquers, enamels), a spray booth with external ventilation is strongly recommended — the fumes are harmful to inhale and can be explosive in enclosed spaces.
What size air hose do I need?
A 6-foot braided nylon hose is the standard for hobby/studio airbrushing. Longer hoses (10ft) are useful if your compressor is far from your workstation but may cause slight pressure drop. Shorter hoses (3ft) restrict your movement. Check thread sizes before buying — 1/8” BSP on the airbrush end is most common.
Is a quick-disconnect really worth it?
Yes, especially if you own more than one airbrush or plan to remove your airbrush frequently for cleaning. Without a QD, you’re unscrewing and rescrewing threaded fittings every time — a small annoyance that adds up. A QD coupling ($8–15) is one of the best small investments for airbrush convenience.
How often should I replace my respirator filters?
Particulate filters (P100) should be replaced when breathing becomes noticeably harder — typically every 40–80 hours of airbrush use. Organic vapor cartridges should be replaced when you can smell solvents through the mask, or every 6 months of regular use (whichever comes first). Always store cartridges in a sealed bag between uses to extend their life.
Do I need different accessories for different paint types?
Mostly no — the same hose, holder, mixing cups, and masking supplies work for all paint types. The main exception is cleaning solution, which must match your paint type (water-based cleaner for acrylics, appropriate thinner for solvents). Your respirator may also need different filter cartridges: P100 particulate for water-based, OV/P100 combo for solvent-based.
Final Thought
The best accessory setup is one you actually use. It’s better to have a small, well-organized collection of the right tools than a drawer full of things you bought once and forgot about. Start with the must-haves, add the should-haves as you settle into your workflow, and upgrade to nice-to-haves when a specific need arises in your projects.
- Best Airbrush for Beginners 2026 — Choosing your first airbrush
- Best Airbrush Compressor 2026 — Compressor guide
- How to Choose the Right Airbrush Paint — Paints by project type
- How to Clean an Airbrush — Complete cleaning guide
- How to Prepare Any Surface for Airbrush Painting — Surface prep
- Airbrush Troubleshooting Guide — Solving common problems